The LCD screen itself is a passive product. It needs power and signal source guidance to display the corresponding content as required. These power and signal sources come from the outside. So how to connect the LCD screen to the PCB board so that it can display according to the instructions? In Hot Display, there are three ways: metal PIN welding method, zebra strip, and setting limit hole + bayonet method.
Metal PIN welding method:
This method is to solder the pins of the LCD screen on the PCB board. According to the special situation of the PCB board, if the PCB board space is too small, the components need to be soldered on the surface; if the customer needs to limit the distance between the LCD screen and the PCB board, in addition to determining the length of the PIN pin, you can also put a sponge pad between the PCB board and the LCD screen or customize a certain height of the seat at the four corners to achieve the effect of fixing the LCD screen. (As shown in Figure 1)
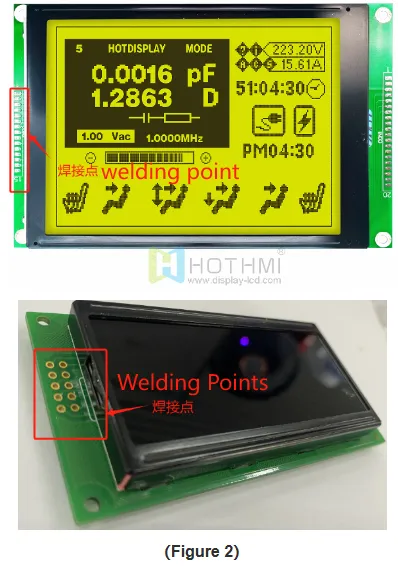
The material used in the welding process is tin. Metallic tin is soft, easy to bend, has a silvery-white metallic luster, and a melting point of 231.89°C. It is widely used in the welding process of electronic products. One end of the PIN needle is connected to the various circuits of the display screen, and the other end is connected to the PCB board. There is a copper round hole at the connection point as a connection port as shown in Figure 2. After the tin is dissolved, it not only has a conductive effect, but also has a fixing effect, which can fix the PIN needle to the PCB board.

Zebra stripes:
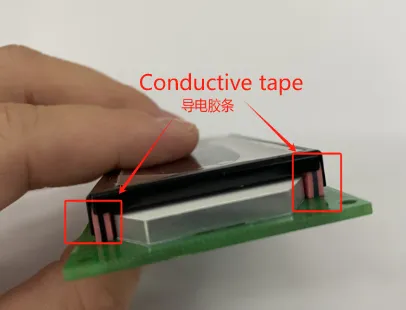
Silicone conductive strips are also called conductive rubber strips, commonly known as zebra strips (Zebra Connector/Elastomeric Connector). Conductive silicone and insulating silicone are stacked layer by layer with hot pressing to form zebra-like patterns, so they are called zebra strips. They are used as a medium bridge to connect two electronic components. The commonly used ones are powder foam electronic conductive glue and silicone electronic conductive glue. Click the link to learn more about the characteristics of these two conductive glues:


The practice of applying conductive strips to LCD screens and PCB boards generally requires metal frame stickers to fix the conductive strips to the structure. At the same time, the operation technology is relatively strict because the lines need to be strictly matched one by one. Unskilled customers are prone to misalignment during the assembly process, resulting in line errors. Therefore, generally, this operation can only be completed at the source factory of the display.
Hot Display limit hole + bayonet method:
Whether it is PIN welding or using conductive strips, the installation operation is not the simplest. In order to save labor costs during the assembly process and simplify the connection operation process between the LCD screen and the PCB board, Hot Display has launched a new assembly solution. The first is the upgrade of the cable. We introduced the soft cable FPC. All the lines, including the positive and negative electrodes of the backlight, are connected to a soft film of special material. Copper pins are used as the connection end at the end of the cable, and then the pin part is connected to the interface on the PCB board.

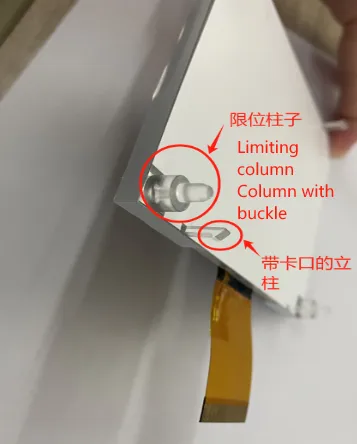
So, how to fix the display and PCB board to the structure? If the customer requires a certain distance between the PCB board and the LCD screen, how can this structure that uses the flexible cable connection method be completed according to the customer's requirements? Here, Hot Display uses a combination of limit holes + bayonet. That is, we arrange holes on the PCB board, which we call limit holes. Correspondingly, corresponding columns are configured on the backlight board of the LCD screen, which are called limit columns. The height of the limit column becomes the distance between the PCB board and the LCD screen. This distance can be customized according to customer requirements. The entire structure can be fixed by inserting the column into the limit hole of the PCB board. At the same time, we design a column with a button on the backlight board. Under the interaction of the limit column and the buckle column, the PCB board will be firmly stuck. This method can not only ensure the distance between the PCB board and the LCD screen, but also ensure that the PCB board is firmly fixed and does not shift. At the same time, since this assembly method is simple to operate, it will save customers some costs from manual operation.

For more solutions and needs, please contact us directly!